Key Takeaway About Practicing Pigeon Pose:
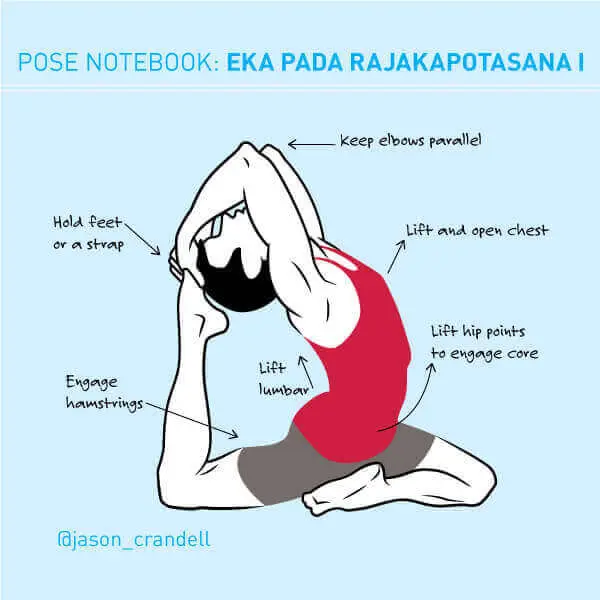
Hands down, Pigeon Pose is my favorite backbend. I love the combination of opening my hip flexors, external rotators, chest, spine, and shoulders at the same time. I also love the feeling of doing a big, demanding backbend. But, I’m not going to lie — I need a belt to hold my foot in the pose. And, when my body is being stubborn I put a bolster under my front leg. The drawing in this infographic isn’t from a photo of me. It’s from a photo I took of Charles, my student. A lot of these pose breakdowns are illustrations of me, but we needed Charles to make this one look pretty.
See also Yoga and Your Hips
So, my one quick tip is to embrace whatever help your body needs in order to get the benefits of this pose. Some postures are so demanding that you can’t do them unless you’re a freak of nature or you started gymnastics at age 3. Even with props, you just can’t get a feel for certain postures. But, Pigeon is incredibly easy to prop. And, when you’re humble — and smart — enough to take the support that you need, you can get all the benefits of this posture. Although the props aren’t illustrated above, I’ll tell you how to use them in the “How To” section below.
WARM UP FOR PIGEON POSE
It’s important to prepare your entire body for Pigeon Pose. More specifically, you need to stretch your hip flexors, external rotators (of your hip), spine, and shoulders. The best way to do this is to do a full backbending sequence that includes Pigeon Pose toward the end. A good option would be to use my sequence for Urdhva Dhanurasana, adding Pigeon after Urdhva Dhanurasana. If you want to create your own sequence, include several lunges to open the quadriceps and hip-flexors; a progression of backbends that include Cobra, Bow, and Upward Bow; and shoulder openers such as Gomukhasana and Dolphin. You might also want to use my 5 Tips for Better Backbends article to get started.
PIGEON POSE- STEP-BY-STEP
1. It’s important that you’re already familiar with the simple forward bending version of Pigeon Pose before you start practicing the backbend. The forward bending version is much more accessible and teaches you how to align your legs and hips for the pose. So, I’m going to assume that you’re already familiar with the basic alignment of forward bending Pigeon before we proceed.
2. Come into Pigeon Pose with your right leg forward. If you anticipate that you’re going to need some help in the pose, grab a bolster (or two blocks) and a strap.
3. The first thing to do if you’re using a prop is to elevate your front hip and thigh. (In this case, your right hip and thigh.) Putting a bolster or a block under you hip alone won’t help. In fact, this might even tilt your pelvis the forward — which is the wrong direction for a backbend. Instead, put a bolster under your right hip, thigh, and knee so that they’re all elevated. If you’re using blocks, put one block under your right sitting bone and one block under your thigh close to your knee. Raising your hip and thigh will decrease the amount of flexibility that is required in your hip-flexors and external rotators to do the pose. It will give you a little boost.
3. The second thing to do if you’re using a prop is to make a loop in your strap, wrap it around the arch of your foot, and tighten the strap snugly. The long tail of the belt will give you something to hold onto if you’re not able to hold your foot.
See also 5 Propped Poses to help You Fall In Love with Backbends
4. Whether you’re using props or not, walk your hands toward your hips and press your finger tips into the floor. Press your front shin and the top of your back foot into the floor. Lengthen your spine and lift your chest. Take a deep breath as you prepare to connect your hands with your back foot.
5. Bend your back knee, reach back with your right arm and take hold of your inner arch (or your strap). If you’re flexible enough to forego the belt, bend your elbow and rotate it toward the ceiling. Also, change the grip on your foot so you’re holding your big toe or the outside of your foot. If you’re using a belt, bend your elbow and allow some of the strap to slide through your hand. Allow enough of the belt to slide through your hand so that you can bend your elbow and rotate it toward the ceiling.
6. Reach your left arm overhead, bend your elbow, and take hold of your foot (or the strap). Now, that you’ve connected both hands to your right foot (or strap), you’re there. Take a few breaths and refine the posture by having a friend read the instructions in the infographic.
7. Take a moment or two after the pose to appreciate what you’ve done. Even if you needed some help, the pose is worth trying — and, worth savoring.
{illustration by MCKIBILLO}