When you regularly practice poses that strengthen your core, you’ll feel more stable in your practice and more at ease in your everyday life. When I skip my core strengtheners, I notice that it’s hard for me to sit up straight and my back gets tired much more quickly as I’m pecking away at my computer.
I look forward to doing core poses more if I have some creative options in my back pocket – and that’s what this post will give you.
In terms of where to put these in a sequence: Core yoga poses are flexible. You can use the poses below as a way to warm-up at the beginning of a practice. You can place them just after your Sun Salutations, standing poses, and backbends. Or you can sprinkle them throughout the sequence to stay connected to your center during the entire class.
(If you want to a clearer understanding of what we mean by “core” and how it all fits together, be sure to read Jason’s Yoga and Your Core, Parts I & II.)
Yoga Poses for Core Strength
Below are four of my favorite go-tos:
Core Connector
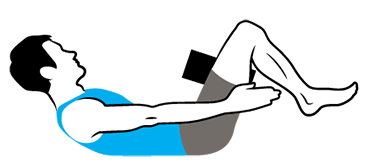
The Core Connector pose is a great multi-tasker: When you squeeze the block, you engage your inner legs. Engaging your inner-legs (your adductors), will help you fire your pelvic floor muscles and your abdominals—especially our transversus abdominis. Typically the inner thigh muscles are weak and underutilized. This pose tones them and teaches you to move your thighbones out of external rotation and into a more neutral position.
HOW TO:
1. Lie back and place a yoga block the long way between your upper thighs.
2. Squeeze the block and feel how it activates the inseam of your legs.
3. On an exhalation, lift your feet off the floor and your head and shoulders off the floor.
4. Reach your arms forward. Keep squeezing. Keep breathing.
5. After three breaths, release the pose and take the block away.
6. Come into Downward Dog to counteract all the squeezing and engaging. Then repeat Core Connector again.
7. Do three rounds.
BE MINDFUL OF:
Your lower back. Ideally, you’ll maintain the slight, natural curve. You do not have to press your lower back aggressively toward the floor.
If you feel any strain in your lower back, try bringing your head and upper back to the floor and just lift your legs. If that doesn’t relieve the strain, keep your upper body and feet on the ground and practice squeezing the block while you draw your navel toward your spine.
WHICH POSES WILL THIS HELP ME WITH?
Inversions
Arm Balances
Refining your standing poses – Try the pose and then try turning on your inner legs in Parsvottanasana, Triangle, and Parsvakonasana.
Lolasana on blocks
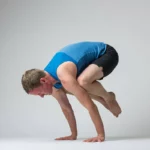
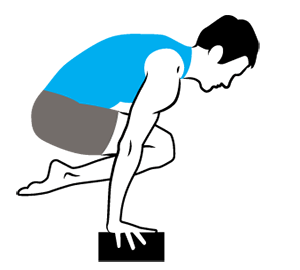
Lolasana is an incredibly hard pose, but it’s a great way to learn to use your whole core region to round your back – a position that you need for poses like Bakasana and Eka Pada Galavasana. This posture engages your entire core and brings even greater emphasis to your hip-flexors and rectus abdominis. This variation on blocks makes it much more accessible.
HOW TO:
1. Sit on your shins in the middle of your mat.
2. Place a block next to each thigh on its lowest height.
3. Lean forward on your knees and cross your ankles.
4. Then, exhale as you round your spine, lifting your knees and then your feet off the floor.
5. It’s OK if you get stuck and can only lift your knees for awhile! You are still working your core.
6. Stay for three breaths and repeat three times.
BE MINDFUL OF:
If you have sensitive wrists and notice compression, this is probably not the best pose for you. Try working on your core from your back instead.
WHICH POSES WILL THIS HELP ME WITH?
Arm balances like Bakasana, Eka Pada Galavasana and Mayurasana.
The infamous “pick-up and jump-through” from the Ashtanga Yoga series.
Reclined Crow
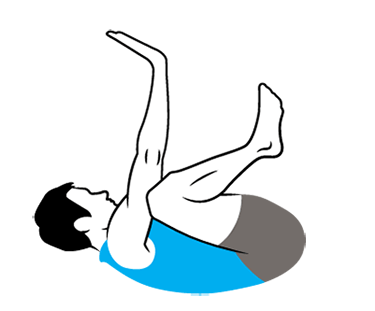
On days when I want to work up to arm balances but my energy is low, I start by doing them on my back instead. It works! This poses strengthens all of your abdominals and hipflexors. Taking crow on your back also gives your body a blue print for how to do the posture on your hands. It doesn’t just strengthen your body—it also teaches your body the muscular coordination and firing patterns that you’ll need to do Bakasana on your hands.
HOW TO:
1. Lie on your back and reach your arms up toward the ceiling. Your palms will be flat, facing the ceiling.
2. Bend your knees and draw them strongly toward your armpits.
3. Now, press the ceiling away as you lift your head and shoulders off of the floor. Notice anything familiar? You’re in Bakasana on your back.
4. Take three breaths. Draw your knees and armpits toward each other.
5. Exhale and let everything go. Repeat two more times.
BE MINDFUL OF:
Your neck. If you flex your neck and pull your chin too strongly toward your chest, you’re going to overwork your neck muscles. Be sure to look up toward the ceiling instead of down toward your chest.
WHICH POSES WILL THIS HELP ME WITH?
I’ll give you three guesses on this one. (Hint: It starts with a “Bak” and ends with an “asana.”)
It will also help you with the same flexed-spine arm balances that Lolasana does — Eka Pada Galavasana, and Mayurasana.
Reclined Handstand
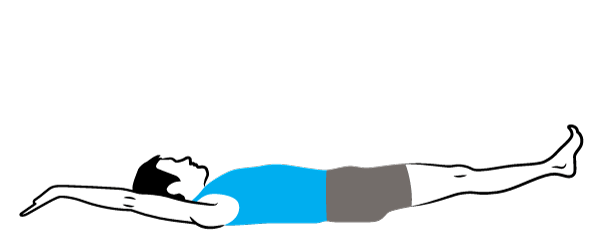
This reclined version of Handstand is a great preparation whether you have a regular Handstand practice or you’ve never kicked up. Like practicing Bakasana on your back, this posture will strengthen all of your abdominals. This is the most demanding of the four creative core postures featured in this article, especially for your tranvsersus abdominis and your rectus abdominis.
HOW TO:
1. Start on your back with your legs outstretched on the floor.
2. Engage your leg muscles and flex your feet as though you’re doing Mountain Pose on your back. Make sure your kneecaps are point up toward the ceiling.
3. Reach your arms alongside your ears and flex your hands. Voila! You’re in Handstand on your back!
4. From there you can exhale and draw yourself into a Reclined Crow with your head and shoulders off the floor. Then, keeping your head off the floor, stretched back into your Handstand shape.
BeBe sure to hug your inner legs toward each other as you reach through the heels and the arms.
5. Repeat this pattern of Handstand –> Bakasana 3-5 times.
BE MINDFUL OF:
Your lower back. If you feel strain, try leaving your head on the floor. If that doesn’t work then bring your legs to 90 degress (straight up toward the ceiling).
WHICH POSES WILL THIS HELP ME WITH?
Handstand
Forearm Balance
{illustrations by MCKIBILLO}